How To Vent A Range Hood On An Interior Wall?: Among kitchen appliances, the range hood stands out as the unsung hero who tirelessly keeps the air in the kitchen clean and fresh. If a homeowner wants to vent their range hood on an inside wall, they may be particularly puzzled about the installation process. To ensure a hassle-free and effective installation in your kitchen, we will unravel the mystery of how to mount a range hood on an interior wall in this article.
Familiarity with the Bases
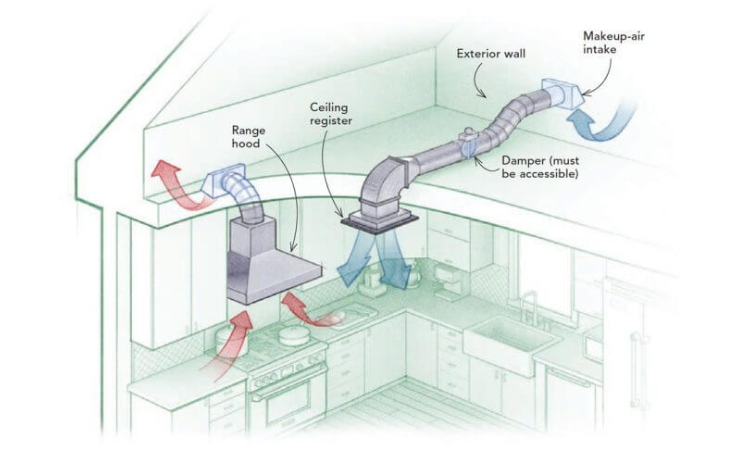
When venting a range hood on an interior wall, meticulous preparation and execution are required. It is critical to know what to expect from the installation process before you start:
- The ventilation ducts are the pipes that lead the hood’s exhaust air away from any potential pollutants. Proper insulation and sizing are essential for optimal outcomes.
- Duct Material: Galvanized steel and aluminum are two of several options for ducting materials. The material needs to be long-lasting so it can withstand the test of time.
- Think About Where You Want the Vents Installed: Think About which interior wall would be ideal for the vents. Ensure it complies with all applicable safety standards and is compatible with the stovetop.
Comprehensive Setup Guide
1. Deciding Where to Put It
The proper placement of the range hood vent is of the utmost importance. Positioning it over your cooking range will allow it to capture and eliminate cooking waste more efficiently.
2. Categorizing and Measuring
It is crucial to have accurate measurements. Before you begin installing anything, make sure you mark the wall with precise proportions. Think About which interior wall would be ideal for the vents. Ensure it complies with all applicable safety standards and is compatible with the stovetop.
3. Carving Out the Vent Hole
Make a clean cut in the wall to accommodate the vent using the right tools. Be cautious not to wreak havoc on the electrical or plumbing systems.
4. Installation of Ductwork
Connect the vent ducts from the range hood by pulling them out through the opening. Secure the ducts in place to ensure a snug fit. Think About which interior wall would be ideal for the vents. Ensure it complies with all applicable safety standards and is compatible with the stovetop.
5. Sealing and Insulation
Put a stop to air leaks by sealing the seams and joints of the ducts. Insulating the ducting can improve energy efficiency and decrease heat loss.
Step 6: Repairing the Oven
Secure the range hood to the wall after positioning it so that the vent hole is in the center. Verify the manufacturer’s instructions and ensure stability for a proper installation. Think About which interior wall would be ideal for the vents. Ensure it complies with all applicable safety standards and is compatible with the stovetop.
To conclude
Properly venting a range hood on an interior wall requires precision and concentration. By carefully following these directions, you can ensure a smooth installation that enhances the functionality of your kitchen while maintaining an orderly and tidy appearance. As far as aromas in the kitchen are concerned, a well-ventilated space is a sight to behold.
All things considered, a comfortable home does not have a well-ventilated kitchen. Following these guidelines, you should have no trouble installing your range hood on an inside wall. Cooking should be a blast!
I hope you like the part where we talked about How To Vent A Range Hood On An Interior Wall? For more content like this, visit our website Kitchenmatts.com.
Enjoyed looking at this, very good stuff, regards.